Orthopedic Instruments | Laser Mark Inspection |
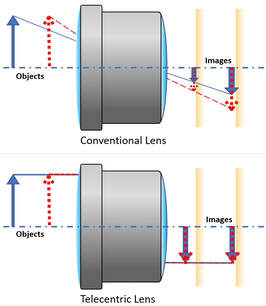
 Conventional Lens verses Telecentric Lens
Their Challenge
An Ohio orthopedic device manufacturer required a method to automate the inspection process of laser marked medical instruments to increase production throughput and reduce scrap rate. Without the right integration techniques, automating to tolerances within thousandths of an inch can be difficult for even the most advanced systems. Prior to installation, our client used a tedious manual process involving a tabletop smart scope, calipers, and precision height measurement tools in addition to visual defect inspection.
Why Choose Canyon Run Engineering?
Canyon Run Engineering Technologies was chosen due to the combination of our precision automation equipment experience and the skills gained working within the medical device engineering industry. Canyon Run Engineering Technologies excels in developing high accuracy inspection, validation, and verification equipment. Our experience in robotic process automation and data collection was key to the success of this improved inspection system.
Our Technical Solution
The new system, designed as part of a complete vision calibration machine, used a Telecentric lens to prevent parallax distortion, allowing for precise measurements in a 3D space. A fixed camera took two pictures 180 degrees a part, on an automated rotary axis, leading to a complete and quick inspection. Maintaining high accuracy and repeatability were the main accomplishments of the new vision system. The cycle time for the inspection process improved from several minutes to one minute when implementing this new system.
Key Features: Fixture design for locating critical features and measuring dimensions. Incorporation of a Telecentric Lens to eliminate perspective distortion for accurate measurements with tight tolerances. Automated rotary axis allowing complete part inspection with a fixed camera. Reduction to cycle time and operator dependence.
Their Challenge
An Ohio orthopedic device manufacturer required a method to automate the inspection process of laser marked medical instruments to increase production throughput and reduce scrap rate. Without the right integration techniques, automating to tolerances within thousandths of an inch can be difficult for even the most advanced systems. Prior to installation, our client used a tedious manual process involving a tabletop smart scope, calipers, and precision height measurement tools in addition to visual defect inspection.
Why Choose Canyon Run Engineering?
Canyon Run Engineering Technologies was chosen due to the combination of our precision automation equipment experience and the skills gained working within the medical device engineering industry. Canyon Run Engineering Technologies excels in developing high accuracy inspection, validation, and verification equipment. Our experience in robotic process automation and data collection was key to the success of this improved inspection system.
Our Technical Solution
The new system, designed as part of a complete vision calibration machine, used a Telecentric lens to prevent parallax distortion, allowing for precise measurements in a 3D space. A fixed camera took two pictures 180 degrees apart, on a rotary axis, leading to a complete and quick inspection. Maintaining high accuracy and repeatability were the main accomplishments of the new vision system. The cycle time for the inspection process improved from several minutes to one minute when implementing this new system.
Key Features: Fixture design for locating critical features and measuring dimensions. Incorporation of a Telecentric Lens to eliminate perspective distortion for accurate measurements with tight tolerances. Automated rotary allowing complete part inspection with a fixed camera. Cycle time and operator dependence reduction.

